You can earn instant hero status by eliminating a pest infestation at a commercial facility. Not so much if the cockroaches, rodents or flies make repeat appearances. Preventing pests, however, is a big challenge, especially when you have limited time to spend inspecting the site’s exterior.
In the PCT Guide to Commercial Pest Management, Board Certified Entomologist Keith Willingham offers tips on inspecting the outside of commercial structures, as well as what to do if you find issues:
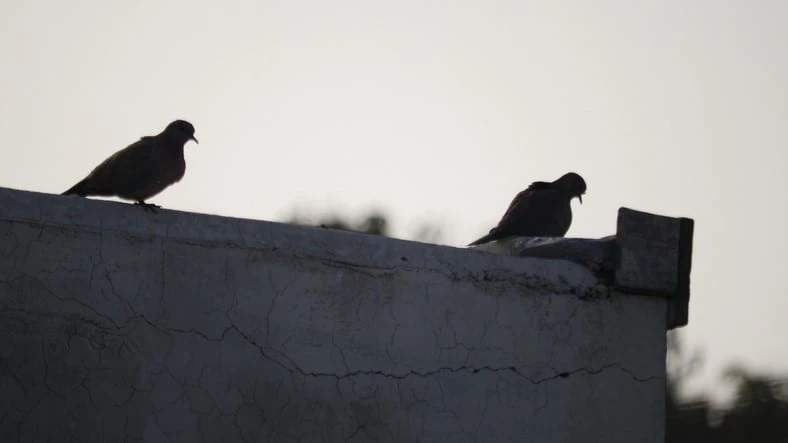
BIRDS NESTING ON THE ROOF. In addition to the problem of the birds themselves, some insects use bird nesting material for food. This material must be removed. Discourage birds from nesting and roosting on ledges by using netting, repellents or other deterrents. Note: Don’t go on the roof unless you know you can do so safely, that you comply with the facility’s safety procedures and have the proper safety equipment. Be extra careful near skylights, which can become brittle with age and collapse if sat or stood upon.
LEAKY PRODUCTION EQUIPMENT ON THE ROOF. Air handlers and production equipment can leak water and food product onto the roof. If the water is green with algae, it has been there a long time. Not only does this attract birds, but it can support flies and eventually leak into the building. Request that your client fix any water or food material leaks.
AIR INTAKE FILTERS AND DRAINS. Ill-fitting air filters can let pests gain entry to the facility. Does your client regularly inspect and replace the filters and drains for air handling equipment? If you regularly find drains plugged and filters in poor condition, the client needs to revise her inspection program for this equipment.
OUTSIDE STORAGE. Food manufacturers and warehouses commonly store wood pallets outdoors. When they’re moved indoors for use, pests can come along for the ride. Pallets stored outdoors should be kept off the ground and above concrete or asphalt, not dirt. Facility employees must be trained to inspect pallets before bringing them indoors.
PERIMETER. Plantings should be located at least 18 inches away from the foundation perimeter. Ivy, thick groundcovers and low-growing shrubs should be replaced, since they provide harborage and keep soil damp, attracting and supporting many types of pests. When the perimeter is not paved with asphalt or concreate, a clear sanitation path of coarse gravel should extend around the perimeter at least 18 inches wide.
AREAS WITH MOLD OR ALGAE. Does the building have mold or algae growing on it? These are signs of excess water, which attracts pests. Look for ground depressions that may fill with water and make sure sprinklers are adjusted properly and not hitting the building. Suggest a switch to drip irrigation to water plants, which also will save water, and discuss the need to have ground sloped away from the building so water drains away from it.
SEWERS, DRAINS AND GREASE TRAPS. If it can be opened, open it. If not, ask maintenance staff to open sewers, drains and traps. Pests commonly found in these areas include American cockroaches and phorid flies, which can find their way into the structure.
TRASH AND DUMPSTER AREAS. Trash bins and compactor equipment should sit on concrete or asphalt, not soil. Set up a monitoring program for this area and talk to the client about how to improve sanitation here.
THE BONE YARD. A “bone yard” is where old equipment and shelving is stored outdoors. Set up a monitoring program for this area as clients often are reluctant to get rid of such stuff. Use monitoring and trend reports to bolster your requests to have the bone yard cleaned up.
GENERAL MAINTENANCE. Are trash and debris found around the structure? Do tall weeds grow next door? Is the driveway in good condition or full of potholes that capture water? Are tree limbs hanging over the roof? Are flowering plants, which attract bees and flies, located near the entrances? Are wood benches and decks in direct contact with the soil? Document and explain to the client why conducive pest conditions must be remedied.
HOLES AND GAPS. Gaps under doors and holes in walls where utility lines and pipes penetrate allow pests to easily enter a structure. Exclude pests by sealing gaps and holes using caulks, sealants and building products recommended specifically for pest management. If a pencil can penetrate a hole or a spatula can slide under a door, so can pests.
LIGHTING. Lights attract flying insects, so visit the site at night to see which lights are brightest and where the light is directed; determine where inside lighting is visible from the outside and seal any cracks and holes near those windows. Recommend that clients place lights in way that draws flying insects away from the building.
WEEP HOLES. Depending on construction, a building with brick veneer may have small weep holes at the bottom of exterior walls where the walls meet the concrete foundation. Small insects can gain entry through these holes. So can rodents if the metal strips at the bottom or top of the masonry (sill plates) come loose. Inspect the holes and metal strips with an extendable mirror.
AIR DOORS. Not all air doors work properly. They may draw flying insects into the building or not have inadequate flow to keep pests out. Check the blower speed and direction by putting your hand into the air flow, and adjust the louvers as necessary. More challenging problems to fix are when air units must to be lowered or moved to the outside of the doorway to provide proper air flow, or if the facility has negative air flow and pulls outside air in when the door is opened. A plant engineer will need to help address this issue.
WINDOWS. Make sure all window screens are tight fitting, in good condition, and made of small enough mesh to exclude flying pests. As well, ensure foundation vent screens are intact and tightly sealed on their sides.
INSPECTION TOOLS. Use the right tools help you perform a detailed inspection:
- Flashlight – Extends the ability of your eyes.
- Extendable mirror – By shining your flashlight on the mirror, you can light up voids and areas above the mirror, such as floor-level lips of cabinets and the underside of sink units that otherwise would be difficult to inspect.
- Spatula – To dig into cracks and under the feet of equipment.
- Small vials and small paint brush – Fill half the vial with rubbing alcohol. Dip the brush in the alcohol and touch a small insect; the insect will stick to the brush and then can be put into the vial for identification.
- Camera - Use the camera on your smartphone or tablet to take photos, which will help you remember what you saw and can be included in the inspection report. Telling the client about a leaking pipe is good; showing her a photo is better. Always ask first if you can take photos in the facility.
- Map of the site – To ensure you inspect all areas. Findings also can be pinpointed on the map, whether paper or digital.
- Notepad – To write out your inspection findings. This can be done via smartphone or tablet app, or old-fashioned paper.
- Inspection forms or checklist – To make sure you ask yourself the correct questions. For example, are outside pallets stored off the ground?
- Binoculars – To look for birds outside and inside the facility and to see dates on product boxes stored 15 to 20 feet up on shelves.
The author is a frequent contributor to PCT.
Latest from Pest Control Technology
- Earn CEUs from Your State at Next Week’s Mosquito Control Virtual Conference
- Preserving Culture, Providing Opportunities Key in Hoffman’s Decision
- Winter Weather Could Decide How Bad Mosquito Season Gets
- Trent Frazer Discusses How Mosquitoes Survive Winter
- Barnes Exterminating Acquires Tennessee Pest Solutions
- Pest Index Up 9% YOY in January
- Arrow Exterminators Acquires Hoffman's Exterminating
- PMPs Plan Mera Peak Summit for Parkinson's